Message Queue for IoT
So there's nothing new about MQTT. It's been around since the 90's, but despite all of this I've just discovered it and thought I'd share, even if it's just as a note to self about the setup.
It stands for Message Queue Telemetry Transport and you can read the Wikipedia about it to dig into it a bit more.
It is simply a publish/subscribe message bus, which means something writes whilst other things can pickup and read the 'published' data. MQTT is a small, lightweight protocol suitable for IoT data and low bandwidth/resource communications.

A bus could look like the above and may have multiple devices connected. For example a sensor may be on one device reading temperature, whilst the other device may do something such as triggering a light to turn on or switch on the heating. Another mobile device could operate as a dashboard to see what's going on.
So what's the big deal? It could all be easily built with some direct connections and some web pages.
Well the great thing about the bus is it's flexibility to add or remove devices. In the above example the sensor on the Pi Zero could be replaced with and Arduino sensor. A new dashboard device could be introduced to also relay the information to your TV or email inbox with a summary. Other devices could be added to react to temperature readings and open/close a window or do other things.
All these changes are possible without rewriting point-to-point code and allows reuse of information.
Setting up
The first thing to setup is the server. This is fairly straight forwardInstall the server from the command line
> sudo apt-get install mosquitto
Install client tools
> sudo apt-get install mosquitto-clients
This should install a running server and add tools for some testing
Run a publish command to write to the bus
> mosquitto_pub -t test -r -m "Hello World"
This writes to a topic called "test" the value "Hello World" and retains the message
Next read the topic
> mosquitto_sub -t test
You should see Hello World
Clear the topic
> mosquitto_pub -t test -r -n
This writes a null message to the topic to clear it
Typically messages are not published as retained messages and would only be on the bus for subscribers to read and then deleted. For this test a retention was used because the mosquitto_sub command wasn't running at the same time as the mosquitto_pub.
Using an EnviroHat

The Enviro pHat is a good Pi Zero board to use for a practical test of MQTT. The Python code is really straight forward to use and there are multiple sensors to collect data.
The Python code can be installed with the following command
> sudo apt-get install python-mosquitto
This isn't the most up-to-date mosquitto, but it's the easiest to install for a demo. Look at the Eclipse paho project because the latest mosquitto code has been merged into there.
Adding PaPiRus
To provide a readable display the PaPiRus e-ink display has been added, but isn't essential for a test

Example Code
Prerequisites for the code
For the PaPiRus setup follow my post to setup. Edit the configuration to set the screen size to 2.0
> sudo nano /etc/default/epd-fuse
Change EPD_SIZE and save
Restart with
> sudo service epd-fuse restart
The Enviro pHAT can be setup by following the instructions from Pimoroni.
For the PaPiRus setup follow my post to setup. Edit the configuration to set the screen size to 2.0
> sudo nano /etc/default/epd-fuse
Change EPD_SIZE and save
Restart with
> sudo service epd-fuse restart
The Enviro pHAT can be setup by following the instructions from Pimoroni.
In the example below, change the string in the connect_async to your MQTT server IP or server
name. I used the code reference for paho.
name. I used the code reference for paho.
Code:
from PIL import Image
from PIL import ImageDraw
from PIL import ImageFont
from envirophat import light, weather, motion
import time
from EPD import EPD
import mosquitto


WHITE = 1
BLACK = 0

def on_connect(client, userdata, rc):
        print("Connected with result code {}".format(rc))

def on_disconnect(client, userdata, rc):
        if rc != 0:
                print("Unexpected disconnection. Return {}".format(rc))
        else:
                print("Disconnected from server")

def write_text(draw, x, y, text, size):
        draw.text( (x, y) , text, font=font, fill=BLACK)

try:
        dis = EPD()
        dis.clear()
        text_size = 14

        client = mosquitto.Mosquitto()
        client.on_connect = on_connect
        client.on_disconnect = on_disconnect
        client.connect_async("mqtt.orbitalfruit")
        client.loop_start()

        font = ImageFont.truetype('/usr/share/fonts/truetype/freefont/FreeMono.ttf', text_size)
        image = Image.new('1', dis.size, 1)
        draw = ImageDraw.Draw(image)

        while True:
                l = 0
                rgb = light.rgb()
                temp = round(weather.temperature(),1)
                press = round(weather.pressure(),2)
                heading = motion.heading()
                lightstate = light.light()

                write_text(draw, 0, 0, "Temp: {}".format(temp), text_size)
                l += text_size
                write_text(draw, 0, l, "Pressure: {}".format(press), text_size)
                l += text_size
                write_text(draw, 0, l, "Colour R:{0},G:{1},B:{2}".format(rgb[0], rgb[1], rgb[2]), text_size)
                l += text_size
                write_text(draw, 0, l, "Heading: {}".format(heading), text_size)
                l += text_size
                write_text(draw, 0, l, "Light: {}".format(lightstate), text_size)

                dis.display(image)
                dis.partial_update()
                draw.rectangle([0,0,dis.width,dis.height], fill=1)

                client.publish("envirohat/temperature", temp)
                client.publish("envirohat/pressure", press)
                client.publish("envirohat/colour/red", rgb[0])
                client.publish("envirohat/colour/green", rgb[1])
                client.publish("envirohat/colour/blue", rgb[2])
                client.publish("envirohat/heading", heading)
                client.publish("envirohat/light", lightstate)
                time.sleep(10)

except KeyboardInterrupt:
        client.loop_stop()
        client.disconnect()
The client code publishes to the topic path "envirohat/". This is a useful way of grouping topics and forms a directory like structure.
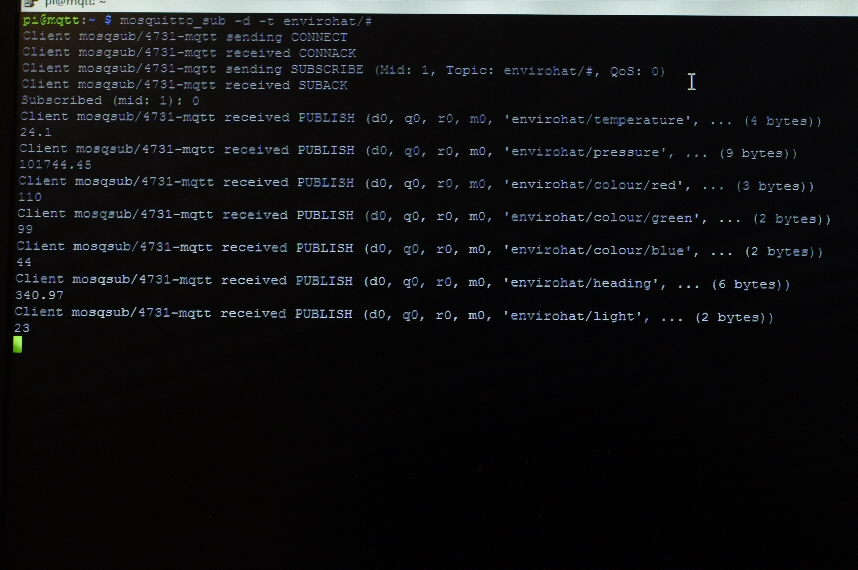
On your server you can type
> mosquitto_sub -t envirohat/#
The trailing # is a wildcard character to show all topics below the parent topic. This displays all values pushed to the bus by the Pi Zero.
Displaying to a Mobile Device
There are a few MQTT clients available across Andriod and Apple.
MQTT Dashboard on Android provides a nice display.
Configure the applications to point to the server and the topic of interest. I used
envirohat/temperature
envirohat/pressure
for testing

Take the Bus
This is just the basics, but the example creates something which can be used immediately for monitoring. Devices reading from the MQTT server can take actions and all the connecting devices can be built in a modular way.