Pi and Beer
Not satisfied with just being a simple home brewer I decided to hook up a Raspberry Pi to control the temperature of my beer fermentation. Pretty useful when I'm too lazy to go into the garage, at work or just wanting to show off some real-time home automation.
In this post I go through how I did this and the technologies used. This is no Craft Beer Pi setup, but it's a good jumping off framework guide.

 |
| OK, this isn't yeast, but it is beer related |
What's in it?
Basically I used OpenVPN, MQTT, Energenie and the reasonably priced DS18b20 temperature probes to build this.
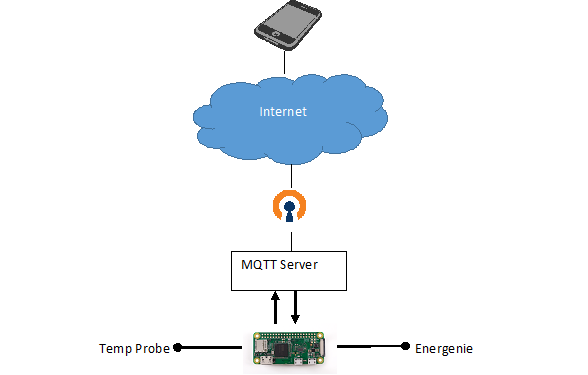
OpenVPN is simple using the software at PiVPN. I don't think I need to elaborate on this much further as it isn't strictly beer related, but it does allow connection to your internal MQTT.
For MQTT just setup the Mosquitto server with:
> sudo apt-get install mosquitto
This gets the main servers installed and running. It's basic and with no authentication, but it will be there.
Energenie sell the Pi-Mote board which fits onto the pins of any Raspberry Pi. Example Python and instructions are on the Energenie site. My own code for the beer control implements a simple Python class to wrap the GPIO calls required to control the power sockets.
I did contemplate and even bought a set of relays to switch mains power and then realised I'd be crazy to mess about with mains voltage in a hobby project. Energenie have done the risky work and packaged it into a remotely controlled solution.

I avoided messing around with strip boards or bread boards and used the excellent ProtoZero board from ProtoBoards.
Build the Pi
 |
| Disassembled view |
The Pi-mote doesn't need any additional work to operate on the Pi. Just plug in and it's ready to go. The Energenie plugs into the top set of 26 pins which makes it compatible with early Raspberry Pi boards.
Incorporating the temperature probe only requires 3 pins and a 4.7k ohm resistor to work (3.3V power, ground and GPIO pin 4). Multiple probes can be chained off pin 4. I've used JST connectors to allow disconnection of the probes when not in use and to allow easy cleaning.
A stacking header is needed to provide pins to the Pi-mote board. Pin 4 isn't required by the Pi-mote and doesn't interfere with the Dallas 1-wire protocol used by the temperature probe.
A stacking header is needed to provide pins to the Pi-mote board. Pin 4 isn't required by the Pi-mote and doesn't interfere with the Dallas 1-wire protocol used by the temperature probe.
 |
| Assembled boards and sensor |
I've used the Pi Zero W for this project as it has all the wireless connectivity built in.
Beer environments involve liquid so it's also wise to move the exposed hardware into a food container.
The ProtoZero board has ample room to expand the number of temperature probes that can be supported as can be seen in the Fritzing image below.
The ProtoZero board has ample room to expand the number of temperature probes that can be supported as can be seen in the Fritzing image below.
 |
| ProtoZero with 2 probes |
 |
| 2 probe extension in action |
Energenie sockets

A commercial solution to DIY electrocution. Powertails also exist for 120V. I'm in the UK and the Adafruit switches wouldn't work so this is the next best thing.
Setup is very simple. Plug in and press and hold the green button until the light flashes. This is set to program mode. Send an "on" signal to associate with the Pi-mote. The programs are remembered even after disconnection from mains power.
I plugged this into the heating mat for the beer fermenter bucket.
With the Python code running this is switched "on" to add heat and "off" when the temperature is at the max level.
The Pi-mote can control up to 4 sockets which is more than enough for beer!
Dashboard
Once all data is going into MQTT then getting the results out is really easy.
Android has MQTT Dash and MQTT Dashboard in the app store. I like the look of MQTT Dash the best for viewing my beer temperature. iOS doesn't seem to have may MQTT apps which work as well as these but I'm keeping an eye out.
Both apps take in a topic and allow read and write access to the data. Metrics such as temperature readings are read-only whilst configuring the heaters can be write access to switch on/off. The apps need configuring to show what you are interested in and how you would like to view the information. It's fairly quick to do and once setup the dashboards can be viewed easily.
 |
| MQTT Dashboard Subscriptions |
 |
| MQTT Dashboard Publishing |
 |
| MQTT Dash growing Lactobacillus (high temp) |
MQTT connection
MQTT provides a message bus to publish and subscribe messages. It's light weight and built for IoT devices.
Development of applications is quick and easy with many supported development languages as well as shell scripting.
A service bus provides a logical disconnect between the presentation layer (UI) and device data. Data on the bus can also be consumed by other devices or applications to provide further automation or new services.
For example; if the service was to go offline a watchdog application could send an email or text to alert that the device needs attention.
Connections can be encrypted and access to the server secured if you are worried of someone stealing data or turning devices on and off without your permission.
Code example
Control is really simple and my code is available on GitHub at https://github.com/AidanHolmes/beerpi.
This provides Python class wrappers for the Energenie and DS18B20 temperature sensors along with a control program to manage temperature using MQTT.